Intended use
Fully Automatic Electronic Blood Pressure Monitor is for use by medical professionals or at home and is a non-invasive blood pressure measurement system intended to measure the diastolic and systolic blood pressures and pulse rate of an adult individual by using a noninvasive technique in which an inflatable cuff is wrapped around the upper arm. The cuff circumference is limited to 17cm-48cm (approx. 6 11/16"-18 29/32")
Contraindication
▲ This wireless blood pressure monitor (electronic sphygmomanometer) is not suitable for people with severe arrhythmia.
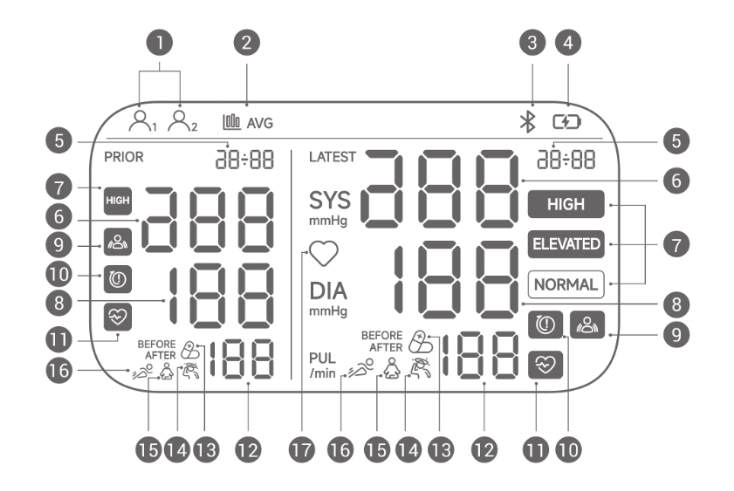
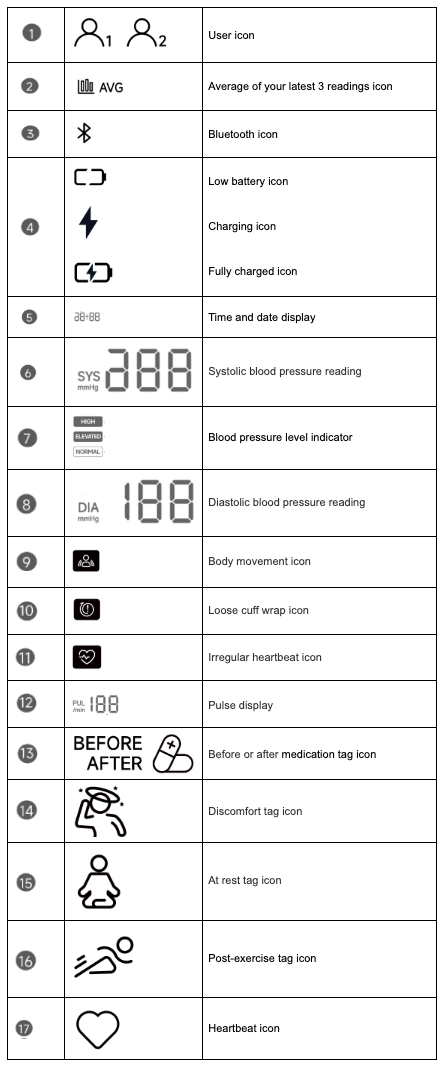
Display Indicators
Setup and Operation
DOWNLOAD THE APP (Optional)
Before first use, download and install the iHealth MyVitals app from the App Store (iOS device) or Google Play (Android device). Use the search term "myvitals". The icon for the MyVitals app will look like this.
First Use: Charging for activation
Unlike previous models that use disposable batteries, the iHealth Jurni (BP-300CL) is powered by a built-in rechargeable lithium battery. Charging the device is required to activate it for the first time.
• Initial Step: You must charge the device before its first use.
• Charging Method: Use the provided USB Type-C cable to connect the monitor to a power source.
• Low Battery Indicator: If the battery level falls below 10%, the screen will display the  symbol, indicating that the battery is low and needs to be recharged.
- Plug in the AC adapter into an electrical outlet
-
connect the USB Type-C power cable to the device
Note:
- While charging, the "Charging" icon
will flash
When fully charged, the icon will stop flashing.
- Once fully charged, unplug the device to avoid overcharging.
Safety Restriction: To ensure safety and accuracy, the monitor cannot be used for measurement while the battery is charging.
TIME AND DATE SETUP
You can set the time and date either automatically (recommended) or manually.
Automatic time-setting:
- Press the
button to enable Bluetooth. The Bluetooth icon
will start flashing.
- Open the iHealth MyVitals app, follow the on-screen instruction and connect to the device.
- The time and date will sync automatically.
Manual time-setting:
- With the monitor powered off, press and hold both the
-
Press the
button to increase it.
- Hold either button to scroll through the values more quickly.
-
Press the "Start/Stop" button to confirm and move to the next field.
- After setting the minutes, the set time will flash twice on the screen as confirmation.
Connect the Cuff to the Device
Firmly insert the air tube connector into the air port on the left side of the device.
Note:
- Ensure the connector is fully inserted to prevent any air leaks during the measurement.
Applying the cuff
-
Pull the cuff through the metal loop. Slide your bare arm through the cuff and tighten it securely. Close the velcro to fasten the cuff in place.
- Ensure the bottom of the cuff is positioned .5" (1 to 2 cm) above your elbow joint and fits comfortably, yet snugly, around your arm.
- You should be able to insert one finger between your arm and the cuff.
-
If applying the cuff on your left arm, Position the cuff so that the cuff tube is in the middle of your arm and line with your middle finger.
-
If applying the cuff on your right arm, Position the cuff so that the cuff tube is at the side of your elbow and in line with your little finger.
Not sure which arm to use?
According to the 2017 AHA/ACC Hypertension Guidelines, you should measure both arms separately at first. If there is a significant difference in blood pressure readings, always use the arm with the higher measurement readings for consistency.
Note:
- Please refer to the cuff circumference range in "SPECIFICATIONS" to ensure appropriate usage.
- Always measure on the same arm for consistency.
- Do not apply the cuff if the arm has inflammation, acute diseases, or skin wounds.
To prevent measurement failure or injury, please avoid squeezing or bending the connection tube during the measurement process
BODY POSTURE DURING MEASUREMENT
Sitting during measurement:
- Sit with your feet flat on the floor and avoid crossing your legs.
- Extend your arm with your palm facing up, resting comfortably on a flat surface.
-
Position the cuff to be at the same level as your heart.
Lying down during measurement:
- Lie on your back
- Place the arm with the cuff straight along your side with your palm facing up.
-
Ensure your arm with the cuff is positioned at the same level as your heart.
To switch between users:
While the device is powered off, press the button located on the right of the device.
You can toggle between User 1 and User 2. The selected user will be indicated on the display when the device powers on.
Note:If the device is to be used by someone other than User 1 or User 2, please refer to the Section: USING GUEST MODE
TAKING YOUR BLOOD PRESSURE READING
Before starting a measurement, make sure the cuff's air plug is firmly connected to the monitor.
1. After securing the cuff and getting in the correct position, press the "START/STOP" button to power on the device.
The screen will display a full segment test-where all display segments, icons, and symbols briefly light up. Use the graphic below as a reference to ensure all expected components appear clearly on the screen.
Note: If any part of the display is missing, dim, or unreadable, please contact customer service
2. Once the self-check is complete, the display will reset to "0" and the monitor will automatically begin the measurement process.
3. After the measurement is finished, the screen will display the following information:
- Systolic and diastolic pressures on the right side (in mmHg)
- Pulse rate (beats per minute)
- Blood pressure level
- Irregular pulse (if detected)
- Previous reading on the left side (if available)
The monitor may show different icons or indicators based on your blood pressure level.
Refer to the section "ASSESSING HIGH BLOOD PRESSURE FOR ADULTS for more details.
Note:
- If you move during the measurement process, the "Body Movement"
icon may appear and the reading may be inaccurate. Please remain still and try again.
- If the "Cuff Wrap Loose"
icon appears, the cuff may be too loose or improperly wrapped. Press the "START/STOP" button to stop the measurement, then adjust the cuff and restart the measurement.
- You can stop the measurement at any time by pressing the "START/STOP" button.
- Always consult a healthcare professional for proper interpretation of your blood pressure readings.
- The monitor will automatically power off after 90 secondsof inactivity. you can manually turn it off my pressing the "START/STOP" button
Using the T.A.G. (Track and Go) Smart TAG Function
Everyday activities can cause fluctuations in blood pressure.
That's why iHealth developed the T.A.G. (Track and Guide) smart tag function. By tagging your readings with contextual information-such as medication, exercise, or physical condition-you can better identify patterns and manage your blood pressure more effectively.
After completing a measurement, you may use the button to label the reading.
- You can select your status by choosing from the preset icons on the device.
- Press the
- The selected tag will be saved along with the measurement.
Note:
Refer to the section "DISPLAY INDICATORS for descriptions of each tagging option.
Viewing Stored Readings
Last Three Readings Average
- Press and hold the
- The left side of the display will show the average of your last three readings.
- The right side will show your most recent individual reading
Viewing All Other Readings
1. Press the button to enter the memory browsing mode.
2. The memory number will appear first, followed by the stored measurement.
3. The most recent reading is shown on the right; the previous reading is shown on the left for comparison.
4. Each reading is saved with a date and time stamp, which will alternate on the screen during browsing.
5. Press the button again to move to the next stored reading.
Note:
If time and date were not set during measurement, the display will show "-:--" instead of a timestamp.
Deleting Stored Readings
To delete all stored readings for the current user
1. While in memory browsing mode, press and hold the button for 10 seconds.
2. The screen will display the content below to indicate that all readings are being deleted.
Caution: this action will permanently erase all readings for the current user profile and cannot be undone
Using Guest Mode
When someone other than User 1 or User 2 needs to use the device, they can use Guest Mode.
To start a measurement in Guest Mode:
Press and hold the "START/STOP" button for 5 seconds while the device is powered off.
Note:
- In Guest Mode, measurement readings will not be saved to any user profile.
- The tag and memory functions are not available in Guest Mode.
Transferring Data to the App
You may transfer your blood pressure readings to the iHealth MyVitals app at any time.
- Ensure that Bluetooth is enabled in your smartphone's settings.
- Open the iHealth MyVitals app.
- Place your phone close to the blood pressure monitor.
- Press the
- Once the monitor connects to the app, the icon will stop flashing and your saved readings will transfer automatically.
Note:
The monitor cannot sync data if the battery is too low or if a measurement is currently in progress.
Understanding the Dual-Display Screen
The iHealth Jurni (BP-300CL) features a unique dual-display layout designed to help users compare their current health status with historical data at a glance.
- Right Side: The right side of the screen is dedicated to the most recent measurement. Whether you are viewing averages or scrolling through history, this side consistently displays the latest reading for reference.
- Left Side : The left side changes its content based on the function you select:
◦ Last 3-Readings Average: When you first press the "M" button, the left screen displays the average value of your three most recent readings.
◦ Individual History Memory: Pressing the "M" button again allows you to cycle through individual historical records stored in the memory on the left side.
◦ Data Comparison: Because the right side keeps the latest result visible, you can easily compare your past readings (on the left) against your most recent one (on the right) to track changes in your blood pressure
Standards
The device follows the ACC/AHA 2017 Guideline. The corresponding color classifications are shown in the table below.
*Individuals with Systolic BP and Diastolic BP in 2 categories should be designated to the higher BP category.
BP indicates blood pressure (based on an average of ≥ 2 careful readings obtained on ≥ 2 occasions).
Source: ACC/AHA 2017 High Blood Pressure Clinical Practice Guideline
iHealth Customer Service
iHealth Customer Service Can be reached via phone at 1-855-816-7705 (Monday-Friday 8:30am to 5:30 PM PT) or via email at support@ihealthlabs.com. Self Help can be obtained 24 hours at the Help Center.